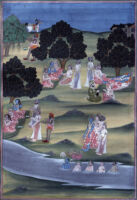
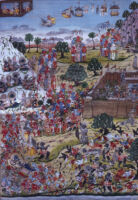
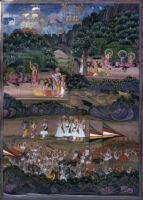
This is folio 11 from the Kishkindhakanda chapter of the Ramcharit Manas manuscript. The illustration shows Sugriva with his army before Rama (top left); Sugriva assigning different directions to monkeys to search for Sita (center), monkeys searching for Sita (bottom right).
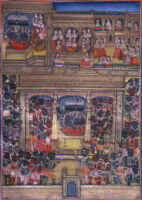
This is folio 45 from the Lankakanda chapter of the Ramcharit Manas manuscript. The illustration shows Bibhisana informing Rama about Ravana's sacrifice (bottom right); monkeys returning to Rama after destroying Ravana's sacrifice. Ravana going to face Rama (bottom); Rama with his arrow ready to fight (center left).
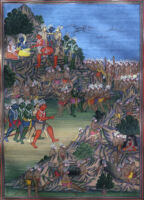
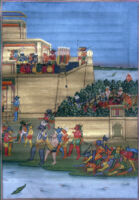
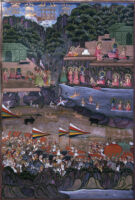
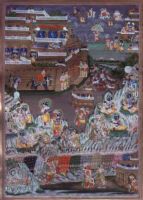
This is folio 4 from the Lankakanda chapter of the Ramcharit Manas manuscript. The illustration shows rakshasas informing Ravana that Rama has crossed the sea (top); monkeys in Lanka harassing rakshasas (center); Rama and Lakshmana crossing the bridge (center).
Notably asymmetrical, the composition, executed in opus tessellatum technique, is situated in a room (possibly a cubiculum) between A2 and A6. Each of the seven preserved figural panels represents different species of bird (duck, heron, parrot, peacock, quail, pigeons and a couple of pigeons drinking water). Some of the panels have additional decorative elements (cups, flowers, fruits, and Floral motifs). Mosaic A5 suffered extensive damage; including burning; loss of 30% of its surface; and mechanical damages. Conservation measures included: documentation (photographs and tracing); cleaning; modern interventions reversed; lime mortar protective band on mosaic edges; weak tesserae were treated with Paraloid B-60 diluted in ethanol; some fragments were reconstructed using retrieved original material. After the reconstruction of the wall foundations, missing parts of the mosaic bedding and big lacunae were filled with new mortar and gravel. For more information, refer to the Final Report or Progress Report 5.
This is folio 44 from the Ayodhyakanda chapter of the Ramcharit Manas manuscript. The illustration shows Sumantra returning to Ayodhya (top); Rama asking boatman (kewat) to take him across the river.
This is folio 41 from the Ayodhyakanda chapter of the Ramcharit Manas manuscript. The illustration shows Minister Sumantra persuading Rama to return (top); Rama and Lakshmana making hair locks (jatas) with the milk of a banyan tree (vata vriksha) (bottom).
This is folio 17 from the Ayodhyakanda chapter of the Ramcharit Manas manuscript. The illustration shows Dasharatha being unconscious (top); Minister Sumantra going to see Dasharatha; Attendants (bottom).
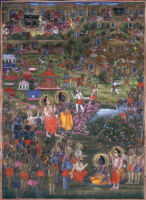
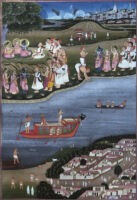
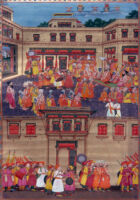
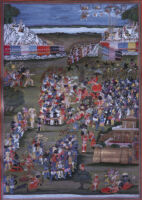
This is folio 116 from the Ayodhyakanda chapter of the Ramcharit Manas manuscript. The illustration shows the messengers from Mithila announcing Janaka's arrival and retiring; people are satisfied (bottom).
This is folio 38 from the Lankakanda chapter of the Ramcharit Manas manuscript. The illustration shows a duel between Meghanada and Jambavana; Jambavana throws him in Lanka; Bibhisana informs Rama about Meghananda's sacrifice (top left); Lakshmana etc. come to disturb Meghananda's sacrifice (top right).
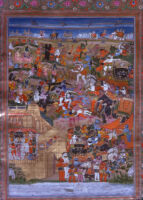
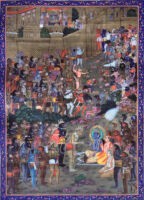
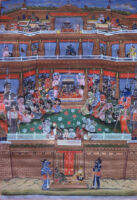
This is folio 26 from the Lankakanda chapter of the Ramcharit Manas manuscript. The illustration shows Ravana in his palace (top left); Meghananda showering arrows on monkeys (center); Hanumana before Rama (bottom).
This is folio 11 from the Sundarakanda chapter of the Ramcharit Manas manuscript. The illustration shows Meghanada using Brahmastra, Hanumana swooning, Meghananda ensnaring him with nagapasha (bottom); Meghananda carrying Hanumana before Ravana (top).
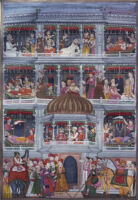
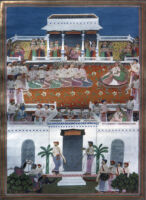
This is folio 10 from the Ayodhyakanda chapter of the Ramcharit Manas manuscript. The illustration shows Manthara and Kaikeyi talking (top); scenes of celebration (bottom).
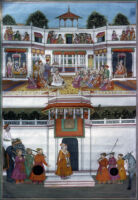
This is folio 7 from the Ayodhyakanda chapter of the Ramcharit Manas manuscript. The illustration shows Manthara trying to instigate Kaikeyi against Rama's coronation (top) goaded by Sarasvati; people rejoicing (bottom).
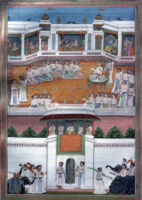
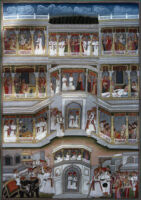
This is folio 9 from the Ayodhyakanda chapter of the Ramcharit Manas manuscript. The illustration shows Manthara and Kaikeyi talking (top); Joyous gathering at the palace (center); attendants (bottom).
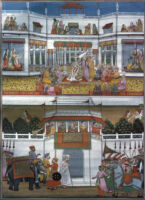
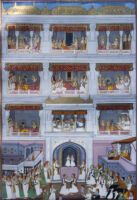
This is folio 8 from the Ayodhyakanda chapter of the Ramcharit Manas manuscript. The illustration shows Manthara and Kaikeyi talking (top); Dasharatha with his ministers (center); attendants outside the palace (bottom).
This is folio 20 from the Lankakanda chapter of the Ramcharit Manas manuscript. The illustration shows Mandodari trying to dissuade Ravana from war (top); Ravana showing arrogance in court (center); attending demons (bottom).
This is folio 18 from the Sundarakanda chapter of the Ramcharit Manas manuscript. The illustration shows Mandodari requesting Ravana to return Sita (top left); Rama conferring with his companions at the sea coast (bottom).
This is folio 5 from the Lankakanda chapter of the Ramcharit Manas manuscript. The illustration shows Mandodari imploring before Ravana to make peace with Rama (top left); Prahasta desisting Ravana from war (bottom).
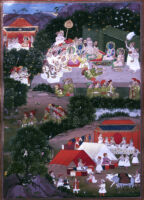
This is folio 61 from the Uttarakanda chapter of the Ramcharit Manas manuscript. The illustration shows Lomas muni (sage) cursing the boy to become a crow (centre right). The crow flees away after touching Muni's feet.
This is folio 62 from the Uttarakanda chapter of the Ramcharit Manas manuscript. The illustration shows Lomas muni (sage) calling the crow back and blessing him to be a worthy devotee of Rama (left: centre-bottom); Kaka telling his own tale to Garuda (centre right).
A large and well preserved fragment of entablature found directly on top of the courtyard pavement could provide a hint as to the architectural decoration of the house. It combines the Doric triglyph with elements of the Ionic cornice in a syncretic approach to architectural decoration that was common in Greco-Roman Alexandrian art. For further details on the architectural remains of Early Roman villa Alpha, see the Final report or Progress Report 2.
This is folio 34 from the Ayodhyakanda chapter of the Ramcharit Manas manuscript. The illustration shows Lakshmana taking leave of Sumitra (right top); Lakshmana going with Rama and Sita to Dasharatha (right center); anxious courtiers (bottom).
This is folio 33 from the Ayodhyakanda chapter of the Ramcharit Manas manuscript. The illustration shows Lakshmana taking leave of his mother queen Sumitra (top left); Dasharatha in bed (right); courtiers in confused state (bottom).
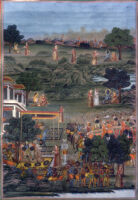
This is folio 99 from the Ayodhyakanda chapter of the Ramcharit Manas manuscript. The illustration shows Lakshmana seeking Rama's permission to fight Bharata in battle (top, right and left), Bharata, Shatrughna and Guha coming to Rama along with followers.
This is folio 98 from the Ayodhyakanda chapter of the Ramcharit Manas manuscript. The illustration shows Lakshmana seeking permission of Rama to fight Bharata (top right); Bharata nearing ashrama (bottom).
This is folio 97 from the Ayodhyakanda chapter of the Ramcharit Manas manuscript. The illustration shows Lakshmana, thinking that Bharata came to slay Rama, seeks Rama's permission to fight Bharata (top); Bharata heading towards Rama with his companions.
This is folio 39 from the Lankakanda chapter of the Ramcharit Manas manuscript. The illustration shows Lakshmana fighting Meghanada (top left); Lakshmana kills Meghananda with an arrow; Ravana, Mandodari and others bewailing Meghananda's death (bottom right).
This is folio 31 from the Lankakanda chapter of the Ramcharit Manas manuscript. The illustration shows Rama bewailing Lakshmana's injury, meanwhile Hanumana comes with the drug; Lakshmana gains consciousness and Rama embraces him (center); Ravana going to Kumbhakarna (top left).
This is folio 13 from the Aranyakanda chapter of the Ramcharit Manas manuscript. The illustration shows Shurpanakha hovering between Rama and Lakshmana (top); Shurpanakha in devilish form (center right); Lakshmana cutting her nose and ears (center left); Shurpanakha inducing her brothers to attack Rama (bottom).
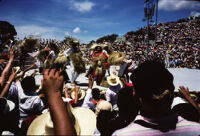
![Monte Albán Site, [Building IV?] view from South, 1982 or 1985](https://iiif.library.ucla.edu/iiif/2/ark%3A%2F21198%2Fzz00093wxx/full/!200,200/0/default.jpg)
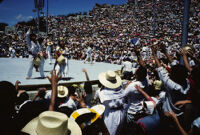
![Monte Albán Site, [Building IV?], 1982 or 1985](https://iiif.library.ucla.edu/iiif/2/ark%3A%2F21198%2Fzz00093w0z/full/!200,200/0/default.jpg)
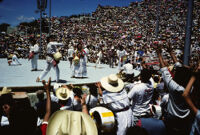
![Monte Albán Site, a Danzante[?] stone, 1982 or 1985](https://iiif.library.ucla.edu/iiif/2/ark%3A%2F21198%2Fzz00093wvw/full/!200,200/0/default.jpg)